Turn Up The Heat
We’ve been successfully roasting turkeys for years. But were we in a rut? Maybe it was time to rethink our traditional methods. Brining produces great-tasting birds, but it’s a cumbersome process and not practical for those with limited refrigerator space. Deep-frying was out of the question: It’s too risky. There had to be an easier, less complicated approach.
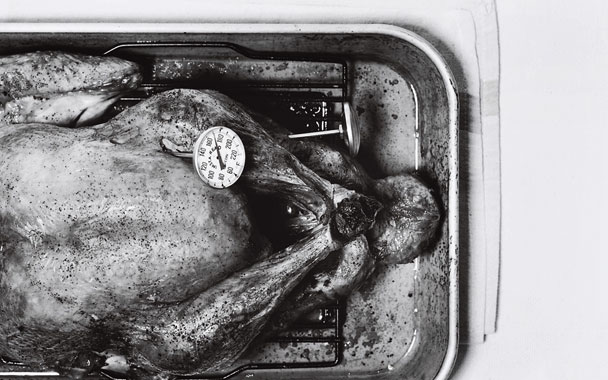
Getting back to basics was anything but simple. We gathered and distilled dozens of approaches into general guidelines, then tested each of them on the same brand of supermarket turkey weighing 14 to 16 pounds. We tried stuffing butter under the skin or leaving it out, basting and not basting, varying the heat versus keeping it steady. We raised the heat, we lowered it. We positioned the bird right side up and upside down. We did everything; and then we pared down to nothing (no butter, no basting, no heat variation). The results astonished us. The turkey no one bet on turned out to be vastly better than the others, winning the beautiful skin and juicy white meat contest hands down. The method? The bird was simply seasoned with salt and pepper, then roasted in a 450ºF oven—no butter under the skin, no basting, no foil tent, just blasted . Skeptical, we tried it again. And again. It kept working. Attempts to improve on it were pointless. Plus, it cooked in record time, only about 1 3/4 to 2 1/2 hours for a 14- to 16-pound bird. (An important note: Starting with a clean oven prevents smoking at high heat. Clean your oven again after roasting because of splatter.) The high-heat method is nothing new. Cookbook author Barbara Kafka popularized it for chickens and turkeys in her 1995 book Roasting, in which she cranked her oven up to 500 degrees. We compromised on 450 degrees to get the benefits of high heat while lessening any risk of burning the pan juices. Harold McGee, food scientist and author of the newly revised On Food and Cooking, confirmed he’s had similarly fine results with the same method. He surmises that because the bird cooks faster at a higher temperature, the outer portions of the breast have less time to become overcooked before the deepest portions cook through.
If you’ve become enamored of brining, as we have, and want to continue, using this method, feel free; it will make for an even juicier, more flavorful bird. (But don’t use the pan juices for gravy; they’re too salty.) And if you’re in the mood for something less than basic but still delicious, try our cover turkey, which features the cross-cultural innovation of using miso to flavor and tenderize the meat. This, however, is a higher-heat followed by lower-heat method. The miso butter blackened the skin when subjected to constant high heat.
Choosing The Bird
Fresh or frozen? Organic, conventional, or kosher? Whichever you select, we don’t think you’ll be disappointed. Using our basic method, we had uniformly good results.
Fresh: We’re partial to a fresh turkey. There’s no waiting for it to defrost—but that means there’s less flexibility as to when to buy it; the USDA recommends no more than 2 days in advance. Keep it on the coldest shelf of your refrigerator.
Frozen: We had consistently good results with a nationwide brand of frozen turkeys from the supermarket. Allow at least 3 but preferably 4 days to thaw the turkey in the refrigerator.
Organic versus conventional: Our past experience with organic turkeys was reconfirmed—the flavor was superior but the white meat was tough. If you go organic, you’ll need gravy. We are also fans of locally raised turkeys from small producers, as much for environmental and sustainability reasons as for flavor.
Kosher: We’ve recommended kosher birds for several years. Because koshering involves salting, we’ve found the birds to be comparable in juiciness and flavor to turkeys that we brined, which involves soaking the bird in a saltwater solution for 10 to 24 hours before roasting. Because they are minimally processed, however, they do require a significant amount of time for painstaking removal of stray feathers and quills.
Turkey Prep: The Day Before
Giblet stock: Do yourself a huge favor—make it the day before. The stock cooks longer (3 hours) than the fast-roasting turkey (roughly 2 hours) and no one wants to wait for the gravy. Plus, it’s always easier to lift solidified fat from a chilled stock than it is to skim it off a hot one. You can shave 2 1/4 hours off the cooking time by using a pressure cooker, and we found the pressure-cooked stock to have superior flavor. Begin by searching for the neck and the giblets—heart, gizzard (a digestive organ), and liver—which are usually tucked away inside the turkey. Often they are packed together in a pouch, but sometimes they’re loose, so check both cavities. Then remove the liver from the lineup. The remaining giblets provide the flavor base for the stock that will become your gravy; including the liver would only add bitterness. Instead, sauté it for a well-deserved cook’s treat, or dice it and sauté it to add to the stuffing.
 Pinterest