One of the best things about live-fire grilling is its simplicity. This is, after all, a technique that has changed very little since the day when some prehistoric genius figured out that food tasted better if it spent time over flames.
But the straightforwardness of grilling is nicely balanced by an intriguing complexity. Unlike the uniform, continuous fire of a gas flame, each live fire has a distinct personality, with complex layers of heat and veins of coal and flame that make it unique. This means that each time you approach the grill, you are facing a new venture, complete with the potential for triumph or disaster. Like working without a net, live-fire grilling contains an ever-present danger—the difference being that the risk is not of a hospital visit, but of a less than satisfying dinner.
The joy of grilling lies in rising to this challenge, and there are a number of key points on the grilling path where making one choice rather than another will skew your efforts toward success or failure. Make the right moves at each of those junctures, and you’re on your way to a great grilled meal.
CHOOSING YOUR FUEL
In the United States, pillow-shaped charcoal briquettes are the default fuel for live-fire cooking. This is certainly not a tragedy, because they actually work quite well. But they have one fundamental problem—they are not entirely charcoal. Briquettes, invented early in the 20th century by Henry Ford to make use of scrap wood left over from forms used in building cars, are made from rather low-quality powdered charcoal that is combined with binders so it can be easily compressed into those little pillows. Some also contain chemical additives for easier lighting.
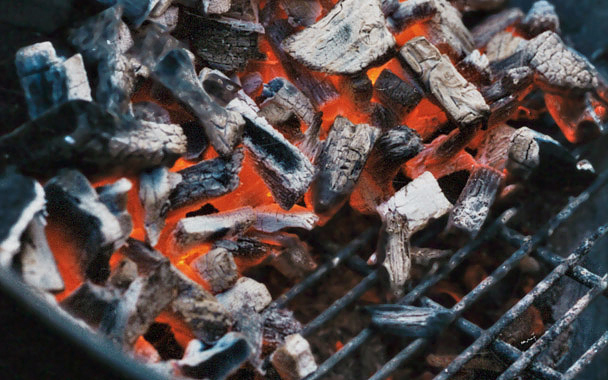
For these reasons, you are better off using hardwood charcoal. Made by the traditional process of burning hardwood in a closed container with very little oxygen, this kind of charcoal is almost pure carbon. As a result, it lights more readily than briquettes, burns cleaner and slightly hotter, and is more responsive to changes in oxygen level, which means you can regulate it more easily.
Our current favorite grilling fire, though, combines hardwood charcoal with an even more atavistic fuel, hardwood logs. To build such a fire, just wait until your charcoal is completely lit, place a small log along one edge of the coals, and—using tongs or some other tool—shove the log a few inches into the glowing charcoal. This produces something close to the ideal setup for grilling: You have some smoke coming from the wood to add a little flavor, you have a portion of the fire that keeps going much longer than charcoal, and, at the same time, you have the more predictable, steady heat of the charcoal.
STARTING THE FIRE
Once you understand how easy it is to light a live fire, you’ll be inclined to do it much more often. The quickest way to gain this knowledge is to buy yourself a chimney starter, one of those rare and wonderful tools that is simple, inexpensive, and virtually foolproof.
A chimney starter is nothing more than a sheet-metal cylinder, open at both ends, with ventilation holes around the lower end, a grate located inside the flue several inches from the bottom, and a handle. To use it, set it in the middle of the grill bottom, fill the bottom section with crumpled newspaper, and then fill the top with charcoal and light the newspaper. The flames will sweep up through the chimney, igniting the charcoal. When the charcoal is red hot, which should take about five minutes, dump it out and put as much additional charcoal as you want on top of or around it. That's all there is to it—and it works every time.
But there are also other good fire-starting options. Despite its bad reputation as a source of chemical fumes, for example, lighter fluid is a perfectly fine choice. If you wait until the coals are all lit before you start cooking (which you should do in any case), all the fluid will have burned off long before you put any food over the fire, so its taste won't be affected.
Another acceptable tool is the electric coil starter, which is nothing but a thick, oval electrical coil with a plastic handle. Put it right on the fire grate, mound charcoal over it, and plug it into a grounded outlet. The coil will soon become red hot, igniting the charcoal it’s touching. At this point, unplug the starter and remove it; the hot coals will ignite the others. After you take the starter out of the coals, set it aside on a fireproof surface to cool, making very sure it is out of reach of children.
Whichever fire starter you choose, the process will be easier if you remember that you don’t have to ignite all the charcoal. Just get a couple of pieces glowing and they will in turn light all the rest. It really doesn’t take that long.
LAYING THE FIRE
However you light your fire, it’s vital to make it a multilevel one. In fact, this is probably the single most valuable tip we can give to fellow grillers. What it means is that, when you build your fire, you should always leave about one quarter of the grill free of charcoal and bank the charcoal in the remaining three quarters of the grill, so that the coals are about three times as high on one side as on the other. Setting up the coals this way is important because if your food begins to burn on the outside before it’s done on the inside, or if there are flare-ups, you can move it to the cooler portion of the fire or even to the area with no fire at all. This arrangement also provides varying levels of heat in the same fire if you want to, for instance, grill a steak over a very hot fire and asparagus over a medium fire at the same time.
CHECKING THE FIRE TEMPERATURE
One of the biggest misconceptions among novice grillers is the assumption that all food should be cooked over the same temperature fire. But if you cook a steak over a low fire, for example, you won’t get that strong surface char, and if you put a delicate fish fillet over a very hot fire, it’s going to be incinerated on the outside before it’s done on the inside. So always check your fire temperature before you start to cook. To do so, allow the flames to build up and subside. Then, when the coals are uniformly gray, put your hand about five inches above the grill grid, palm side down. If you can hold it there for five to six seconds, you have a low fire; three to four seconds is within the medium range; and one to two seconds means you have a hot fire.
COVERING THE FIRE
The covered grill is a marvelous invention because it allows you to smoke-roast, barbecue, and even cold-smoke in your backyard. But too many grillers overuse the cover. Here’s our basic rule: Don’t use the cover when the food that you are cooking is directly over the coals; it gives the food an “off” flavor, which we believe comes from the fat that drips directly onto the coals, vaporizes, and is trapped inside the cover. Many sources of grilling advice say that you should use the cover to douse a flare-up. Don’t. Instead, if you have built a multilevel fire as described above, you can simply move the food away from the coals until the flare-up has died down.


 Pinterest


