Master sushi chefs may train for years, but all you’ll need to get things rolling at home are the basic instructions, ingredients, and equipment outlined below. With a bit of time, space, and dexterity, you can go from DIY dream to dinner, whether for a party or a small supper for one or two. The proportions in this article will make about 10 maki, which is enough to serve four to six people, and can be scaled up or down as needed.
1. Rice Reigns
The single most important element of sushi-making is the cooking of the rice. It’s so important, in fact, that future sushi chefs in Japan spend the first two of their seven years of formal training learning to master this step. For the best shot at success, be sure to buy the right stuff: Japanese short-grain sushi rice. A few of my favorite brands are Kokuho Rose and Nishiki, but you can also opt for Koshihikari Premium or Tamanishiki, all of which can be found in large supermarkets, specialty stores, or online. Whichever you choose, remember that the type of rice is more important than the brand: Do not attempt to make sushi with anything but sushi rice. Other types contain lower levels of amylose (the sugar found in rice grains) and will not achieve the required sticky texture.
2. Rinse and Repeat
Sushi rice is processed for packaging with added rice starch powders (and sometimes talc), so it’s essential to wash off this residue before cooking to avoid ending up with a pasty, goopy mess.
Start by measuring the rice: To make enough maki to serve four to six people (about 10 rolls), you’ll need 2 cups of raw sushi rice.
Next, transfer the rice to a fine-mesh sieve. Set the sieve inside a large mixing bowl that you’ve placed in your sink, and run cold water over the rice until the water reaches the top of the sieve. Turn off the tap and swish the rice around in the sieve until the water becomes cloudy. Lift out the sieve, drain the cloudy water, and return the sieve to the bowl, refilling it with fresh water.
Repeat this rinsing process three or four times until the remaining water is 90 percent clear, and then let the rice drain for 15 minutes. This may seem like a lot of advance work, but Japanese legend says there are seven gods living in each rice grain, so treat your rice with respect!
3. Practice Patience
When it comes to cooking sushi rice, there’s a fine line between perfectly puffed grains and edible glue. If you’re using a rice cooker, just place the washed and drained rice into the cooker along with the appropriate amount of water, turn it on, and you’re all set. If you’re using a pot, follow a 1-to-1 ratio for sushi rice to water and bring the mixture to a boil. Once it has reached a boil, cover the pot with a tight-fitting lid, reduce the heat to the lowest possible setting, and cook the rice for 15 minutes. After 15 minutes, turn off the heat entirely and let the rice sit and steam in the pot, covered, for 10 more minutes. Whatever you do, do not peek!
4. The Shari-zu Secret
Shari-zu, a blend of sugar, salt, and rice vinegar, is the key to perfectly seasoned sushi rice. When stocking ingredients, remember to select unseasoned rice vinegar (steer clear of the pre-seasoned variety) so you can control the amount of sugar and salt. To make enough shari-zu for 2 cups of raw sushi rice, whisk together 4 tablespoons unseasoned rice vinegar with 8 teaspoons sugar and 1 teaspoon salt until dissolved.
Transfer the cooked sushi rice to a hangiri (a Japanese cedar rice tub) or a wooden bowl. A stainless steel or glass dish will also do the trick, but wood is best because it absorbs moisture from the rice. Use a rice paddle or wooden spoon to spread out the rice and break up any big clumps, and then drizzle it with the shari-zu. Fold the rice over itself to fully incorporate the shari-zu, but be careful not to mash the grains. Traditionally, you would have an assistant fanning the rice as you fold it, but whether or not you have a helping hand, the goal is to continue folding the rice until it stops releasing steam. Once you’ve reached this point, cover the rice with a damp towel as you prepare your fillings.
5. Fine-Tune Your Fillings
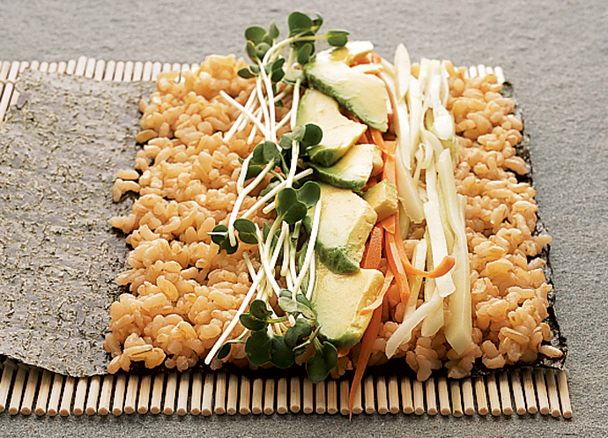
Less is always more when it comes to fillings, so as you plan what to wrap up in your roll, think minimal and trade America’s all-you-can eat mentality for a refined and balanced Japanese aesthetic. Thin strips of cucumbers, scallions, daikon radishes, avocado, and other veggies are suitable for sushi, as are prepared seafood such as crabmeat, smoked salmon, cooked wild shrimp, and cooked eel. You’ll want a total of about 1 pound of fillings to make 10 maki (roughly 1/4 pound each of crabmeat, avocado, salmon, and cucumbers, for example). Cut ingredients into long, thin strips about the size of a pencil.
 Pinterest