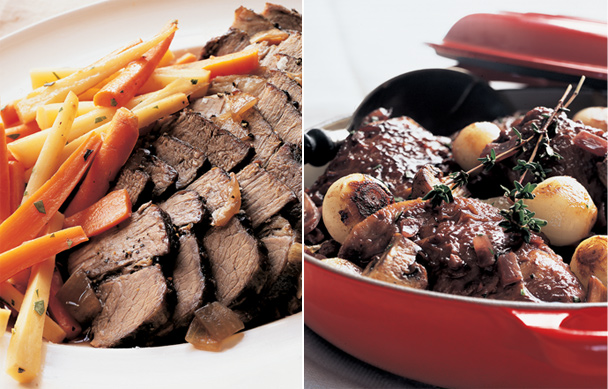
From succulent braised chicken to flavor-soaked pot roast, a good braise fills the house with enticing aromas that draw everyone around in anticipation of a comforting meal. Vegetarians and fish lovers can also get in on the pleasures—and ease—of braising by adapting this time-honored technique to sturdy winter vegetables and firm-fleshed fish.
At its most basic, braising entails gently cooking in a covered pot with a little bit of liquid, yet it is also open to infinite improvisation. Keep in mind the tips that follow, and you’ll be creating wonderful braises all winter long. A great place to start is with my three accompanying recipes: Coq au Vin, Zinfandel Pot Roast with Glazed Carrots & Fresh Sage, and Honey-Glazed Five-Spice Baby Back Ribs.
1. Choose the right main ingredient for taste and texture.
A successful braise delivers swoon-worthy tenderness and a satisfying depth of flavor—as long as your main ingredient is well chosen. For meat or poultry, this generally means selecting cuts from the tougher, more rugged, and often more economical parts of an animal, such as the shoulder, leg, neck, and brisket. It helps to understand that all meat is muscle, and as muscles develop, they get tougher and more flavorful. When it comes to cooking, the only way to coax these hardworking muscles to tenderness is with gentle, moist heat—as in braising. Fortunately, when tough cuts collapse into succulent morsels, their true flavor comes forward, delivering fantastic taste and texture. Here are some favorite braising cuts:
- Beef: Chuck roast, blade roast, short ribs, brisket, and oxtail
- Veal: Shanks, shoulder, and breast
- Pork: Boston butt, shoulder, ribs, and belly
- Lamb: Shoulder, leg, shanks, and breast
- Poultry: Thighs and legs
When it comes to nonmeat braises, look for sturdy varieties of seafood or vegetables. For instance, the best seafood choices have a dense, not-too-delicate texture; halibut, tuna, salmon, scallops, and shrimp all fit the bill. Fish steaks hold up a bit better than fillets, and the bones add flavor to the braising liquid, though fillets can work well, too. For vegetarian options, focus on hearty, fibrous vegetables such as cauliflower, leeks, cabbage, fennel, and winter root vegetables.
2. Choose the right pot.
Braising dates back to ancient times, long before ovens, when a cook would tuck ingredients into a tightly covered pot and bury the pot in the embers of a slow fire. (The term comes from braise, the French word for “ember.”) Today, the ideal braising pot is one that mimics this mellow, even transfer of heat—a cast-iron Dutch oven, with or without enamel coating, is perfect. If you don’t have a proper Dutch oven, reach for the heaviest pot with the tightest-fitting lid you can find. When it comes to size, choose a squat pot that fits the ingredients snugly—this results in the deepest concentration of flavor.
3. Brown the meat, poultry, or vegetables.
Braises often start with browning meat, poultry, or vegetables in a small bit of fat in order to achieve an appetizing rich color and boost the overall flavor. One key to browning (also referred to as searing) is to be sure the surface of the food is dry before it goes into the pot; a wet surface will cause meat and poultry to spatter and stick, and wet vegetables won’t develop the gorgeous caramelized surface we’re after. I generally pat the food dry with towels and season it just before browning (unless, of course, I’ve marinated or preseasoned it).
Heat the braising pot over medium-high, and add just enough fat to cover the surface of the pan. Depending on the dish you’re making, you can use anything from vegetable or olive oil to duck or pork fat. Once the fat is hot, add your main ingredient, taking care to avoid overcrowding. For instance, when working with smaller pieces—such as short ribs or chicken thighs—brown them in batches, allowing enough space between pieces so they sizzle and don’t steam. And finally, be patient when browning—don’t turn too soon or often—and adjust the heat if needed. Your goal is to develop an even, nicely browned surface without scorching.
When it comes to braising seafood, it’s best to skip the browning and start with the aromatics (step 5). It’s a necessary shortcut, since both browning and braising would overcook the seafood. And if there’s a slight trade-off in depth of flavor compared with a meatier braise, there is also some time saved.
4. Evaluate the drippings.
After browning, set the main ingredient aside, slide the pot off the burner, and take a look at the drippings. You should have a thin slick of fat with some nicely caramelized pan drippings. If there is an excess of fat, pour off almost all of it, leaving just enough to coat the bottom of the pot—but be careful not to pour off any of the savory drippings. Check to see that the drippings are not burned or blackened. Remove any scorched bits you find—the tip of a paper towel works nicely. If all of the drippings have burned, wipe out the pot and start with fresh fat.
5. Add aromatics.
In kitchen parlance, aromatics is a general term used to describe a range of vegetables, herbs, spices, and other flavorings. True to their name, they’ll enhance the fragrance of whatever you’re cooking. The possibilities are wide open, extending from cured meats (bacon and chorizo) to briny bits (olives and capers) to fruits and spicy things (citrus and chiles). While we often identify braised dishes by the main ingredient (be it lamb shanks, pot roast, or tuna steaks), the element that truly defines the character of a dish is the selection of aromatics. By sautéing a thoughtful combination of aromatics in the reserved drippings, you’re creating a flavor base that will permeate the entire dish as it braises.
Choose your aromatics according to flavor compatibility and your taste. For instance, I love the way chicken, garlic, and rosemary work together, so after browning chicken thighs, I may sauté whole garlic cloves and chopped rosemary in the drippings before returning the thighs for braising. For pork ribs, perhaps I’ll add a bit of minced ginger, garlic, chile, and scallion. When braising fennel bulbs, I might add sprigs of thyme, a handful of black olives, some coriander seeds, and a few anchovy fillets. Most aromatics are best sautéed until they begin to soften and release their flavors. The aromatics may be nothing more than a chopped shallot and a few herbs or something as complex as a Spanish sofrito.
6. Add liquid.
By definition, every braise needs some type of liquid, and as with the aromatics, your choice of liquid has a great influence on the final dish. The most common braising liquids are broth and wine, often in combination, but there is no reason to limit yourself. Other great choices include beer, cider, fortified wines, spirits, soy sauces, and fruit or vegetable juices. But before you start randomly dumping into your pot whatever bottles you’ve got open, stop and think about what goes with what. A successful braise requires careful consideration of how the flavors will build on each other.
For instance, mushroom broth pairs nicely with beef, but it needs a bit of acidity, perhaps a splash of sherry. Start simply and build from there. Also keep in mind that too much liquid will leave you with a diluted finished product. Ultimately, you want to start with enough braising liquid to come about one-third of the way up the sides of the main ingredients. To get a more concentrated flavor and richer consistency, consider reducing the liquid by simmering uncovered before returning the browned main ingredient to the pot.
7. Simmer quietly.
Braising can be done on top of the stove or in the oven. Oven-braising is virtually hands-free, while stovetop braising requires a bit more vigilance to maintain a quiet simmer. In general, I recommend the stovetop for quick-cooking, small-scale foods such as chicken thighs, salmon steaks, or fingerling potatoes, which take under an hour and don’t require a lot of flipping to cook evenly. For larger cuts, use a moderate oven (275 to 325°F). Never rush a braise—the liquid should remain at a slow simmer.
8. Finish and serve.
In the end, braising is remarkably forgiving in terms of timing and presentation. Any good braise only gets better if left to sit a few hours, or even a few days in the fridge, before serving. Also, while you can gussy up a braise by straining the braising liquid, adding freshly sautéed vegetables and garnishes, you can also serve it directly from the pot. Pop open an easy-drinking bottle of wine, slice up a crusty loaf of bread, and call it dinner.
Molly Stevens writes about food and cooking from her home in Vermont. She is the author of the James Beard Award–winning All About Braising and of All About Roasting, and she teaches cooking classes throughout the United States. Keep up with her on Facebook and Twitter.